Round and Round We Go1/19/2019 Well ladies and gents, I got the tailcone up to the point of almost priming in preparation for final assembly when I began looking things over and it dawned on me. How the heck am I going to rivet this thing together, its clearly a 2 person job. I thought I would be able to do as I have seen others do and find way to rivet it up myself but there's just no way. My wife sure as heck is not interested in helping me build, nor does she have the time. We do have 2 year old twins that are into everything and she is still teaching which means working on planning every night when the kids are down. Its just simply not going to happen so I decided before I went any further to stop as once the tailcone starts coming together there is no turning back due to the size. So now I am at a crossroads. I love the -10 and the capability it brings to the table so not sure if I should hang onto the -10 and finish the -12 first. AHHHH decisions, decisions. If I hang onto the -10 empennage it likely wont be touched until I build the 12 and things free up with the spouse to lend a hand when needed for bucking rivets. Maybe a -10 empennage will be on the market soon... Still pondering. For now though I am 100% assured that I am going to move forward with finishing the RV12iS. So as you were before updates will be coming to the RV12 build site @ Buildanrv12.weebly.com.
0 Comments
Tailcone First Assembly12/4/2018 Following completion of the rear bulkheads last week I got to work on the very tedious task of cutting all of the stiffeners to the correct lengths then you have to cut the ends of each stiffener to a 45 degree angle. Once all the cutting has been completed its then a lot of measuring. In order to ensure the stiffeners are drilled at the correct location when fitted behind the tailcone skins you have to draw a perfectly straight line down the middle (5/16" from the edge) the entire length of each stiffener. This took lots of time as each stiffener has a natural bow in them from the pressing and bending process. Ensuring I had them clamped to eliminate the bow and using a straight edge to connect my measurement points about every 8 inches or so and the result is a straight line. You then have to measure 3/16" from each end of the stiffener creating a 't' so you know where to drill your first hole when looking through the holes of the skins onto the stiffeners. Once that is complete its cutting out the 3/16" hole in the longerons and cutting the remaining material out to the edge for clearance when attached to the tailcone. The most onerous task of all was bending these things approximately 2 degrees downward to match the skins. I broke my vice in the process and ended up using the side of my work table to clamp the longerons to for the preloading and whacking process, I cant say it was pretty but they're bent. Alas assembly on the tailcone began starting with attaching the inner ribs to the bottom skin, hanging the 3 side stiffeners and finally the skin. Drilling took a couple days for each side with all of the umpteen thousand holes drilled (that's what if felt like) the tailcone is now upright awaiting the top skins to be attached. More to come later folks, I am traveling to Chicago tomorrow for work for the remainder of the week which means no time to work on the plane. Later Get Cone11/28/2018 The elevators are FINALLY finished! Thank goodness, it felt like I was never going to get those things completed and nearly 1 month to the day they are stored upstairs with a queen size bed, dresser and many other airplane components. Finishing them up was taking time mainly due to waiting on the pop rivets for the rear spar, once those arrived that took all of 10 minutes to complete then it was onto the dreaded pro sealing of the foam ribs for the elevator and trim tabs as well as the trailing edge wedge for the elevators. A couple days curing then time to rivet the trailing edge and cutting the hinges for the trim tabs, some riveting and viola! My least favorite part of assembling is bending the leading edge which went fairly smoothly. The very last step is riveting the leading edge I just finished bending with some PVC pipe, packing tape and cleckos. Although I found that bending was much easier if you can eliminate the cleckos and only use tape. All of that leads us to today where I started on the TAILCONE!!! This is the last component of the empennage and I cannot believe its already here! I better order those wings soon! The tailcone starts off with cutting and tapping the rear tie-down housing which was going great until I realized my bandsaw blade was a dull as a butter knife. Ahh off to harbor freight for a couple new ones. Cutting went really quickly after that followed by aligning and match drilling holes. After that I started assembling the rear bulkhead and the inner ribs which is where I left off. More to come.. Later Things are "Lifting Up"11/12/2018 ,As of my last post I had both of the elevators mocked up and ready for final drill until I ran into a clecko issue. Rather than order more cleckos I decided to disassemble the right elevator and complete the left elevator up until a point where it freed up my cleckos. So if you start at the very last picture where I have the elevator assembled, final drilled and then disassembled for deburring, cleaning, dimpling and priming you can follow along from bottom to top. Starting with the left elevator the same ol routine kicked in with my not-so favorite part of drilling umpteen thousand holes, moving cleckos and drilling the remaining undrilled holes. Then it is time for disassembly and the other monotonous process of deburring every hole.. Ahh, bet you can tell I really enjoy this part of the process lol. During priming my $10 harbor freight spray gun finally crapped out on me as the primer had completely clogged the inner ports of the gun, not too bad as I've been using this 1 gun since I started and the results have been excellent. I managed to clear enough holes to finish up the left elevator parts with good enough results. Nothing gets that AKZO primer off, once it touches a metal surface consider it on there permanently which is why I am assuming it is so popular in aviation. Following primer my absolute favorite part of the process began with final assembly and riveting. Starting with back riveting the elevator rib halves to the skins as well as the doubler plate, which I forgot to prime. Then its a matter of riveting one side of the rear spar to the skin where the trailing edge sticks out and covers the spar. Its crucial to know which side (top or bottom) to rivet as there will be a hinge for the Servo Tabs and that will be riveted later. Rather than creating the bucking bar I ordered the MK-319 pop rivets Vans allows to be used instead and am awaiting those to arrive. The process was the same for the right elevator and now have both elevators assembled waiting on the pop rivets so I can finish them up. While waiting I decided to start on the trim tabs first by making the "V" shaped molds to hold them followed by making the trailing edge bend tools required to bend the edge which came out amazing btw. I primed up all the parts for the trim tabs yesterday and hope to start assembly as soon as I receive the pop rivets in so I can pro-seal the foam ribs to the elevators and trim tabs at the same time. See yall soon! Big Mistake... Well Hold On10/30/2018 Immediately following my post last week I went back to work on the elevators and in about ten minutes I realized I made a pretty big mistake when drilling the 5/8" hole that is drilled near the bottom skin close to the bull horn on the front spar of the left elevator. I was looking at the spar upside down when I drilled the hole which put the hole near the top skin, DOH!!! How could I have made such a dumb mistake, I was furious at myself as I now had to order another spar as I had already done on the Vertical Stabilizer earlier in the build. I am not trying to make a $150K plane cost $200K and at this rate with dumb mistakes my checking acct is taking a toll. I was too mad to even place an order for the spar that day so the next morning I went ahead and submitted the order. Well I was working on my budget for work while sitting in the garage stewing over my mistake again when I had a thought to look at the right elevator spar... Low and behold I made the same mistake on the right.. DAMMIT! Well wait a minute the spars are mirror images of each other so if I swap the spars the holes will be on the correct side annnnd cha ching.. See below both elevators assembled with both cable holes on the bottom of the spar! Guess I will have an extra spar for an elevator if someone needs. I need to order more cleckos as when drilling the elevators the plans specifically state to clecko every hole after drilling so I am on hold once again. Ordering today.. See yall soon. 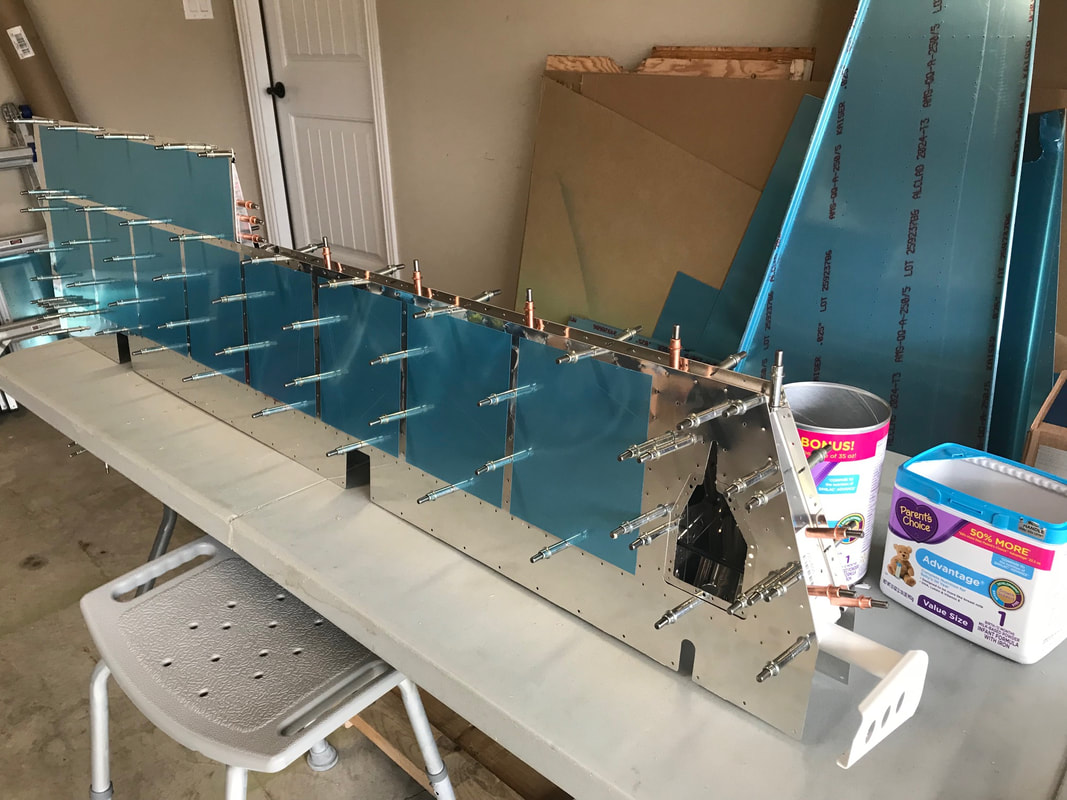 Horiz Stab Done, Elevators Begin10/24/2018 So again sorry the pictures are all backwards, One of the things I dislike about weebly is that you must upload all pictures at the same time and have no control as to the order they upload in. So first off I finished final assembly on the Horizontal stabilizer and it joined the other RV10 and RV12 pieces in the guest bedroom which I caught a nice pano view of in the pics below. Riveting the HS took 3 days of riveting only bc I had limited times to work on it. On to the Elevators the same ole routine kicked in starting with separating the 8 ribs into 16 and a lot of cleanup deburring to follow. Once that was finished it was deburring the edges of all of the rest of the elevator compnents then bending the 2 tabs where the trim tab will sit and I was able to get 1 elevator assembled. As for now thats where I stand. Looking to get lots of work done Friday afternoon and Saturday during the day as i will be stuck home smoking pork shoulders and a brisket for a halloween party my inlaws are hosting Saturday night. Happy Halloween if I dont have another post by the 31st. I will be dressed as Jason to accompany my bro in law who will be Michael Myers. More pics next week. See yall soon. Busy Weekend10/12/2018 So as titled, last weekend was a busy one. First off was the completion of the rudder now that I have the Pro-Seal or goop as commonly referred to by others. While the goop is very thick and can be difficult to work with I would say the worst part was the smell of it, nauseum sets in pretty quick. After completing that and letting the rudder set for a day the top part of the rudder had to be completed and that meant working with the lead weight and reading the plans over and over again to understand exactly what they wanted me to do. After a while though it went together fairly smooth and I was happy with the end result. The bending of the tabs on the leading edge was a whole other story however. The plans in section 7 call for using a 1 1/4" pipe to roll these edges into a curve so they can be riveted together. well a 1 1/4" inch OD pipe is too big and using a 1" or even 3/4" pipe would have been better as section 5 of the plans originally say to use. You cannot get enough bend in the tabs enough to rivet them together, however a broom handle later and the rudder is finally completed. I have to say this was the most difficult component to work on thus far and I am glad its over. A lot of select language was used during the building and I had to walk away quite a few times as the spaces are tight to work in, it smells horrible from the goop, I had to fix several mistakes and it was hot humid and so on. I had built the cradles for the horizontal stabilizer the prior week as I was ready to start pre-assembly of the HS. With the rudder out of the way I could now focus entirely on the HS and was happy about it. There was a lot of prep work on the inspar and nose ribs. Some of the inspar ribs had to have some sections removed which required lots of filing and deburring in tight akward spaces. Once everything was deburred and the skins prepped it was time to start cleckoing up to prepare for final drill which is where I left off. The Alliance air show is this weekend but it is suppose to storm all day tomorrow so not sure if I will be in attendance yet. If not much work to be done on the plane. See yall soon. Vertical Stabilizer Complete10/3/2018 The only work I've been getting done on the plane has been on the weekends as I've been traveling to MO, OK, and KS for the last few weeks. Next week ill be in Orlando so hopefully I can get some work in this weekend. This may sound bad but I actually hope for rain on the weekends, or just one weekend day as it makes it difficult to get out of the house with the kids, which keeps us home, which allows me to spend hours in the garage. Anyways I finished up the VS last weekend. Most of the day Saturday was eaten up prepping the new VS spar that I screwed up earlier. After having that all prepped it was priming all the remaining parts and some of the HS parts that were ready for assembly. I have to say I was really nervous as this would be the first time I riveted with the gun and bucking bar on an actual plane part. I bought one of those swivel flush rivet heads with the non-slip rubber skirt a couple weeks ago in preparation for this as my flush plain rivet head was moving around quite a bit on me and I was damaging some practice parts. Well using the new flush set I screwed up every rivet as I soon realized the skirt doesn't allow the head to sit flat on the skin which caused my first few rivets to set not flush with the skin. I quickly went back to my old set and viola. I was amazed at how quickly my skills developed riveting. I felt really comfortable by the end of the VS. I found having painters tape over the rivet set and tape protecting the edges of the bucking bar made a huge difference in protecting the skin and internal components. I eventually got to the point where the sound of the rivet was a good indicator of when it was bucked properly. I received the Pro-Seal in but by the time I finished the VS I didn't have the minimum 2 hours left to complete the rudder. All of the steps on the page that the pro-seal is applied must be completed and it takes about 2 hours according to Vans. So I will try to get that done this weekend with some spousal help. Sunday I was able to spend a couple hours getting the HS front spar/doublers riveted up. Those 4-9 rivets are looong. The blurry picture below is me trying to get a picture of the rivets inside the VS when I first started riveting as you cannot see what they look like - epic fail. From Coffeyville, KS... Goodnight yall and see ya soon. Horizontal Stab Start9/27/2018 I have had to do some jumping around over the past couple weeks and well now I have the VS and Rudder on hold due to waiting on parts and supplies. I ordered the pro-seal for the edge of the rudder and it should be in Friday so I can finally finish at least one piece. For now though it was the beginning of the HS, this was a lot of monotonous drilling and cleckoing for what felt like about 4 hours. the rear spar, which is pictured primed took the brunt of it. The front spar involved a lot of cutting as the first step is deburring and trimming the inspar doubler angles and also cutting the other long and short doublers. I am pretty sure I need a new bandsaw blade now. The priming process is not as bad as I initially thought, the hard part was figuring out how much you need for a certain amount of parts. In my first trial I had all of the rudder parts and had to make 3 batches of the AKZO mixture to finish. The HS parts only took 2 batches so I am hoping by my next prime I can keep to 1 and not have much waste as this stuff, like all other airplane stuff is expensive. Heck the pro-seal was nearly $70 for 1 quart. If you followed along on my -12 build log you may have noticed that I kept track of the build time. I will not be doing that for the -10. With the significant amount of extra time the -10 takes I feel it would be discouraging to keep track of it. Not to mention the tediousness of just having to keep up with it. If I get 15-20 mins of work in well it gets difficult to track. Traveling for work a bit this week so probably wont be much progress until after the weekend. See yall soon Its Go Time9/23/2018 On Sunday, Sept 9th I met up with an RV10 owner at our local airport who graciously offered his plane to take me up so I could experience an RV10. Up until that point I had never even flown in or sat in an RV before. It was probably a good thing I hadn't flown in Tj's RV10 while building the RV12 if you've been following along on my -12 build site. I likely would have come home and thrown it out, haha! Just kidding, but I have to say when Tj went full throttle down the runway taking off, I was pleasantly pushed into the seat and not even 10 seconds later we were climbing out off the runway at over 1800 fpm and climbing at what the RV12 max cruising speed is. I didn't realize it at the time but I must have had a grin from ear to ear for the rest of the flight and for a week after as my cheeks were sore. What an amazing plane to fly in and thank you again Tj for my first RV and RV10 ride! Well a few days later the empennage kit for the -10 arrived and just like before I knew exactly what to do, pop the top and start inventorying. There was a decent side hole in the side where a forklift must have punctured the side but a peek inside revealed no damage, WHEW! Inventory took a few hours and I was only missing a couple pieces with the exception of the stuff on backorder, which was only one small hardware bag. Over the last 10 days I've worked on the Vertical stabilizer until I made a pretty big mistake while countersinking the VS rear spar. I accidentally countersunk 22 holes that were supposed to be dimpled. I managed to get everything to near assembly state when the whole project came to a halt. I am now awaiting the new spar from Vans. With the VS being on hold I figured I would start on the Rudder the amount of work that goes into each little step is much more than the -12 and I can see why this plane takes nearly 4x the amount of time to build. Also I am priming with AKZO primer which is another additional step in the process. Well I have the Rudder up to the point where the trailing edge has to be sealed with Pro-Seal which I didn't have so another order to Vans and now waiting on that along with the VS spar. So now, today I started on section 8, or the horizontal Stabilizer and was able to get all parts that connect to the main spar primed and ready for assembly. Sorry about the pictures below being out of order, something glitched when I transferred them over and for some reason I cannot move or even rotate pictures. Also now that I have the website up and going my updates will be a little more detailed. Wanted to keep this one as an overview as a lot has been done thus far. See yall soon. Archives
December 2018
Categories |


 RSS Feed
